If you want to get hooked on fishing, or even if you’re already “in the club,” a bobber is one of the best tools to stoke the angling fire. That’s because nothing generates anticipation quite like waiting for a bobber to dunk down below the water when a fish bites.
Just don’t fall into the trap of thinking a bobber is only for beginners. Fishing a bobber – also called a float or cork – is a highly effective, highly adaptable method for catching freshwater and inshore saltwater fish. The float lets you suspend a lure or live-bait rig at a pre-set depth, so you can keep your presentation right in front of the fish. It also acts as a visual strike indicator that can reveal even the slightest bite.
Here are the basics to get you started and help you progress to more advanced bobber-fishing techniques.
The 2 Basic Types of Bobbers: Fixed and Slip
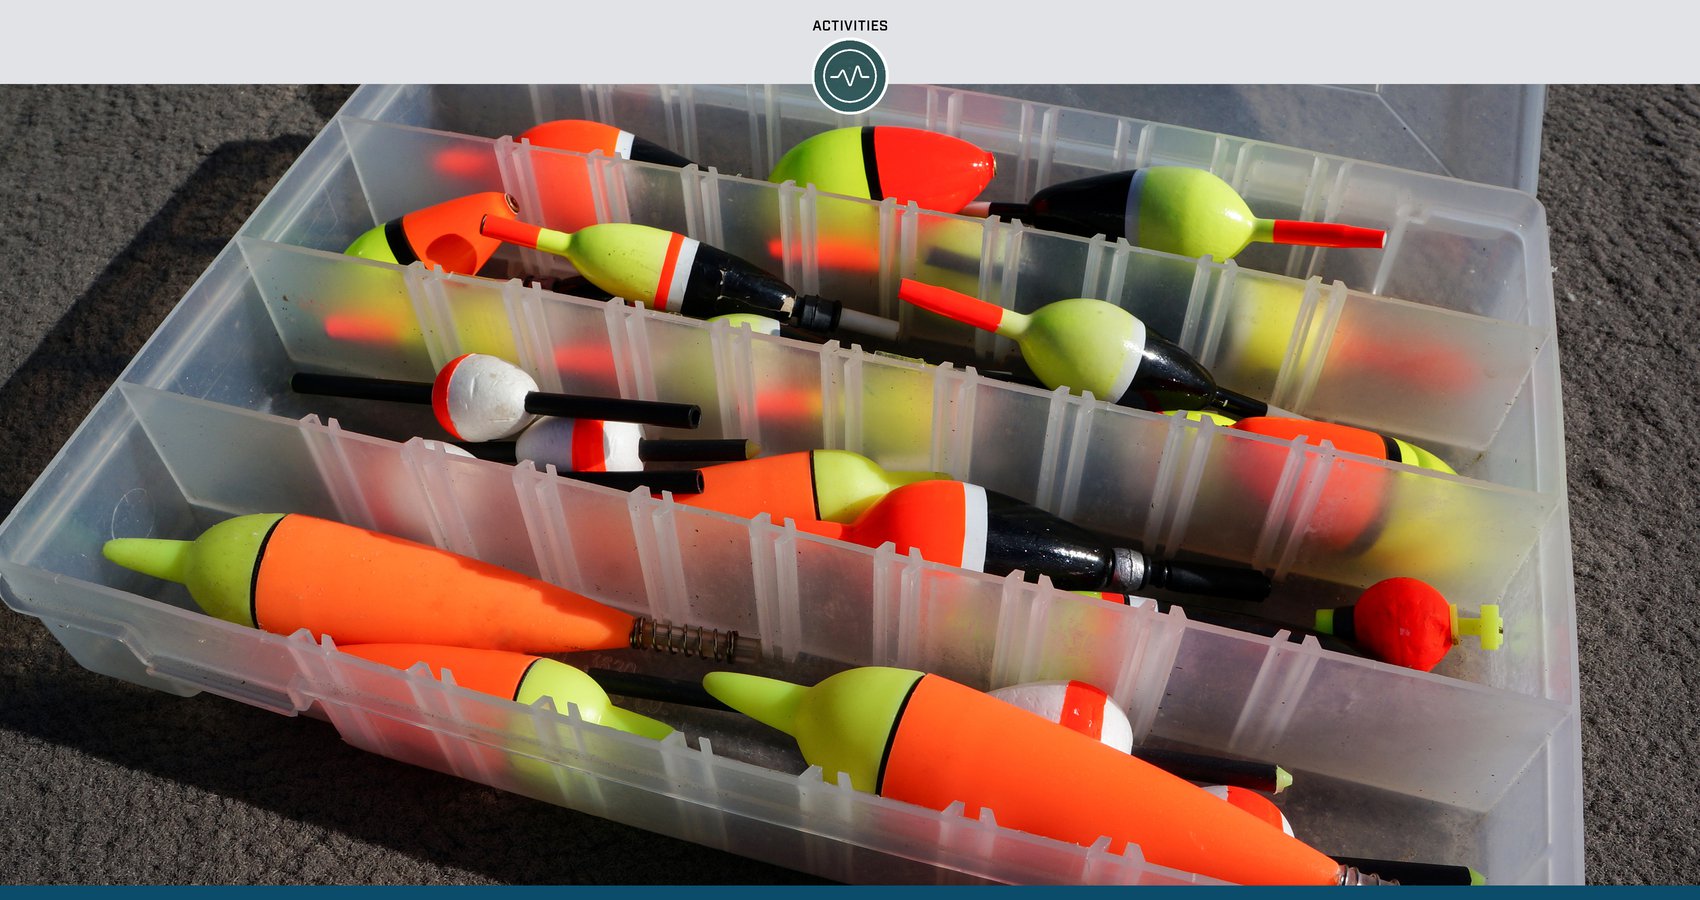
While there are many types of floating devices used for everything from offshore drifting to fly-fishing, the two types of bobbers that cover most of the bases for conventional light-tackle fishing are fixed bobbers and slip bobbers. They’re usually made of plastic, foam, balsa or other types of highly buoyant wood, in shapes ranging from spheres and acorns, to oblong eggs or pencils. Generally, the heavier the rig you’re trying to fish or the bigger the species you’re targeting, the bigger the bobber should be.
Fixed bobbers, including the traditional red-and-white bobber, are clipped to the fishing line a set distance above the lure or bait. Though simple to use, there is a catch: If you’re fishing more than a few feet deep, a fixed bobber makes it difficult to cast and net fish because of the long line dangling down below the float.
Slip floats eliminate the casting issues and let you suspend your lure at virtually any depth – from just below the surface to right near the bottom. They work by sliding up and down the line. After you cast, when the bait or lure sinks, the slip bobber slides up the line until it comes to rest against a depth stop, or “bobber stopper.” When you reel the rig back in, the float slides back down the line. The weight of the slip bobber also helps you cast farther and more accurately when fishing a lightweight bait or lure, such as a fly.
Keys to Setting Up a Slip Bobber
1. Rigging depth stops – Most slip bobbers are packaged with a handful of threaded bobber stoppers and some small plastic beads. The thread is wound around a small plastic rigging tube. To rig it, put your line through the tube, slip the thread off the tube onto the line, then tighten the thread around the line and trim the tag ends. Next, slide on a bead. Then slide the bobber on the line. The bead keeps the bobber from sliding past the thread. All it takes to set the depth is to slide the stopper up the line as far as you want it.
2. Choosing jigs and hooks – The most common presentations for a slip-bobber rig include various types of live bait fished on a simple Aberdeen or bait hook, and small jigs rigged with soft plastics or bait. You can also get creative and experiment with spoons, hair jigs, flies, colored beads and more.
3. Balancing the rig – When rigged right, a slip bobber should reveal even the slightest tap by a fish – the bobber will either dunk down or, if a fish gently engulfs the bait, the bobber can actually pop up. The only way to see those bites is to balance the bobber with the right amount of weight. Most bobbers have a line or color change painted around their midsection. When properly balanced, the bobber should float upright, with the waterline roughly even with that painted line on the bobber.
Some bobbers are weighted to help with balance or can be partially filled with water to adjust buoyancy. If you need more weight, you can use a larger jighead or pinch a couple split shot on the line below the bobber. Another option is to slide a small bullet or egg sinker on the main line, tie on a swivel and then add a leader to connect your jig or hook.
Keep in mind, if you’re fishing live minnows, don’t put your weight too close to the bait, or the minnow won’t be as lively. Keep the weight at least 18 inches or so above the minnow.
Adding Action
How you “work” the bobber can vary by situation. With live bait, you might not need to do anything, especially if there’s a light chop on the water providing some subtle movement. If it’s calm, you can shake or twitch the rod tip, or even swim the bobber slowly along – a great way to get some action out of a soft-plastic lure. In current, you can let the bobber drift through the edges of slack water, over deep holes or past individual pieces of cover.
Versatility and Adaptability
A bobber is a fantastically versatile tool. Set it deep to dangle a minnow over a walleye-holding hump. Set it shallow to catch bass and bluegills with plastics on the edge of a weedbed. Pitch it up next to a dock to catch seatrout on live shrimp. Or use it to lazily drift cut bait through a river pool to tempt a big, ornery catfish. That’s the fun part – experimenting with different lures, baits and presentations, all the while enjoying the anticipation of your bobber getting dunked.
